A stop loss prop firm strategy is not simply about putting a protective order below a recent low or above a recent high. Stop placement directly affects position size, loss per trade, reward-to-risk, and how many losing trades your challenge account can survive. A stop that is too tight can produce repeated small losses from normal market noise. A stop that is too wide can force you to reduce position size or expose too much of your drawdown allowance.
This guide is for traders attempting prop firm evaluations, particularly beginners and discretionary day traders who struggle with consistent risk. It is not for traders looking for a guaranteed formula for passing a challenge. No stop-loss method can compensate for a strategy without a genuine trading edge.
Quick answer: does stop loss placement affect challenge passing rate?
Yes, but indirectly.
The stop loss does not, by itself, make a strategy profitable. Its position affects the amount of capital exposed to each trade, and in turn affects the amount of losses your account can sustain.
For example, let’s say a trader has a $100,000 evaluation account and decides to risk $500 a trade. A 25 point stop and a 50 point stop can equal the same $500 risk, if you adjust your position size accordingly.
The mistake is to move the stop further and not reduce position size.
That means the risk moves from a controlled $500 to maybe $1,000 or more. A few normal losing trades can then eat up a large part of the drawdown allowance.
So the more important question is not ‘How many points should my stop be?’ “It is:
Where is my trading idea invalidated, and what position size keeps the resulting loss inside my risk limit?
What a stop loss means in prop trading
A stop loss is an order or predefined exit level designed to close a position when price reaches the point where the original trade thesis is no longer valid.
For prop traders, that definition has an additional layer. The stop must make sense technically while also fitting the firm’s drawdown rules.
Most challenge accounts have some combination of:
| Risk factor | Why it matters |
| Daily drawdown | Limits how much you can lose in one trading day |
| Maximum drawdown | Determines when the account fails completely |
| Profit target | Determines how much profit is required to pass |
| Position limits | May restrict exposure or concentration |
| Consistency rules | Can affect how profits from individual trades are counted |
| Trading restrictions | May affect news, overnight, or holding behavior |
The exact rules vary by firm and account type, so traders should always read the current rulebook before calculating risk.
This is one area where competitor articles often focus heavily on technical stop placement while giving less attention to the interaction between stop distance and prop firm drawdown.
The stop-loss and position-size relationship
The basic calculation is straightforward:
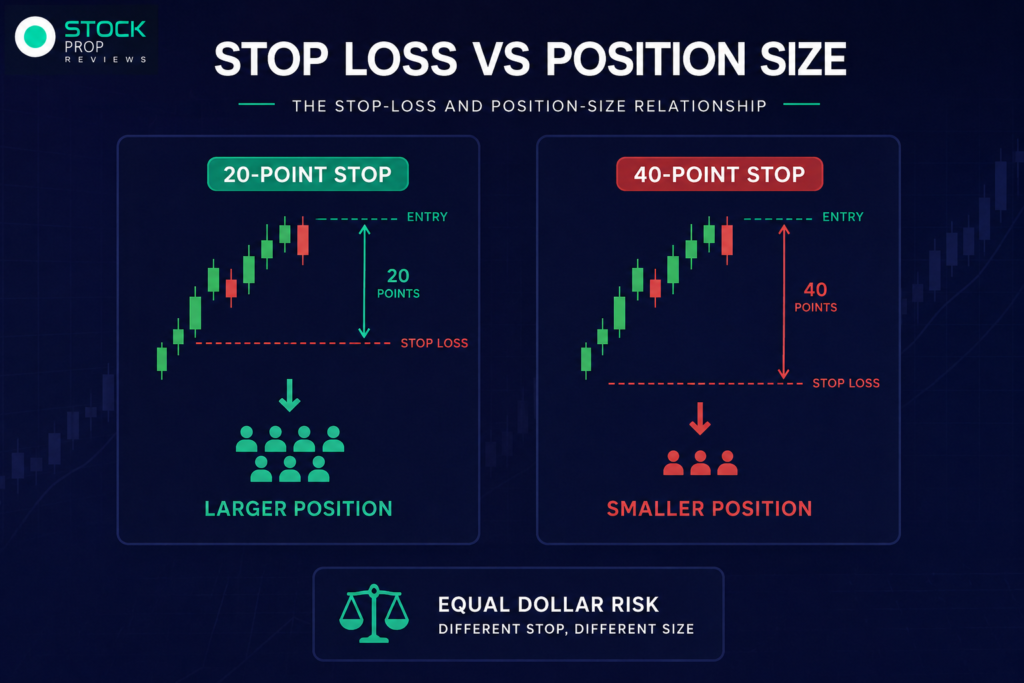
Position size = Maximum acceptable loss ÷ Stop-loss distance
Consider a trader who is willing to lose $500.
With a 20-point stop, the trader can use a larger position.
With a 40-point stop, the position must be approximately half as large to maintain the same dollar risk.
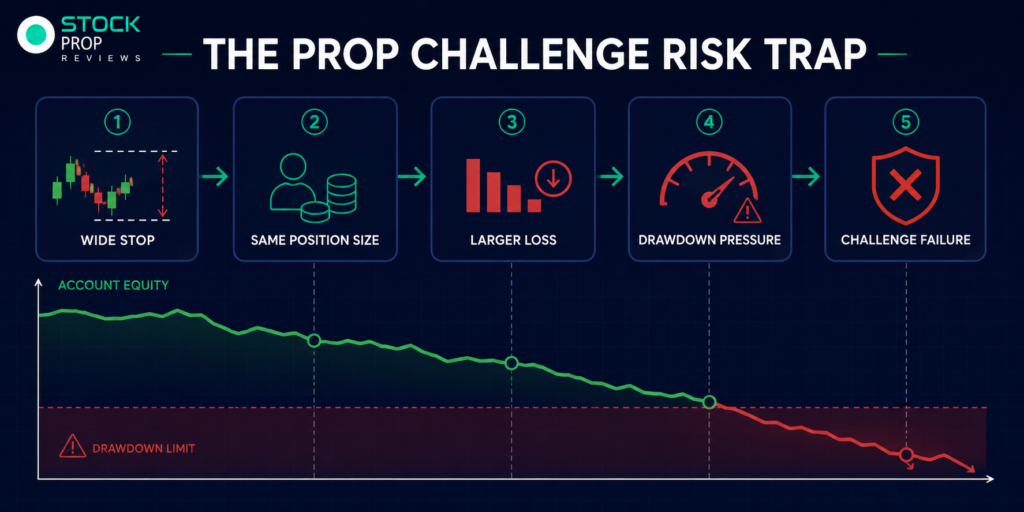
That relationship is important because many challenge failures happen in the opposite direction. A trader identifies a wide technical stop, keeps the same position size they normally use, and unknowingly doubles their monetary risk.
A recent prop trading risk framework similarly emphasizes calculating position size from the stop distance and the amount the trader is actually willing to lose rather than from the headline account balance.
Example: the same setup with two different stops
Imagine a long trade at 500.
Your technical invalidation is 490.
A 10-point stop is therefore logical.
If your maximum trade risk is $500, you calculate your position size around that $500 risk.
Now suppose the market is particularly volatile and you decide the setup needs a stop at 480 instead.
That can still be a valid trading decision.
But you cannot keep the same position size.
The correct response is to reduce exposure so that a move from 500 to 480 still represents approximately the same planned loss.
This is what traders often miss: a wider stop does not automatically mean greater risk. A wider stop combined with unchanged position size does.
Stop placement strategies for prop firm challenges
There is no universally best stop location. The correct method depends on the strategy, market and timeframe.
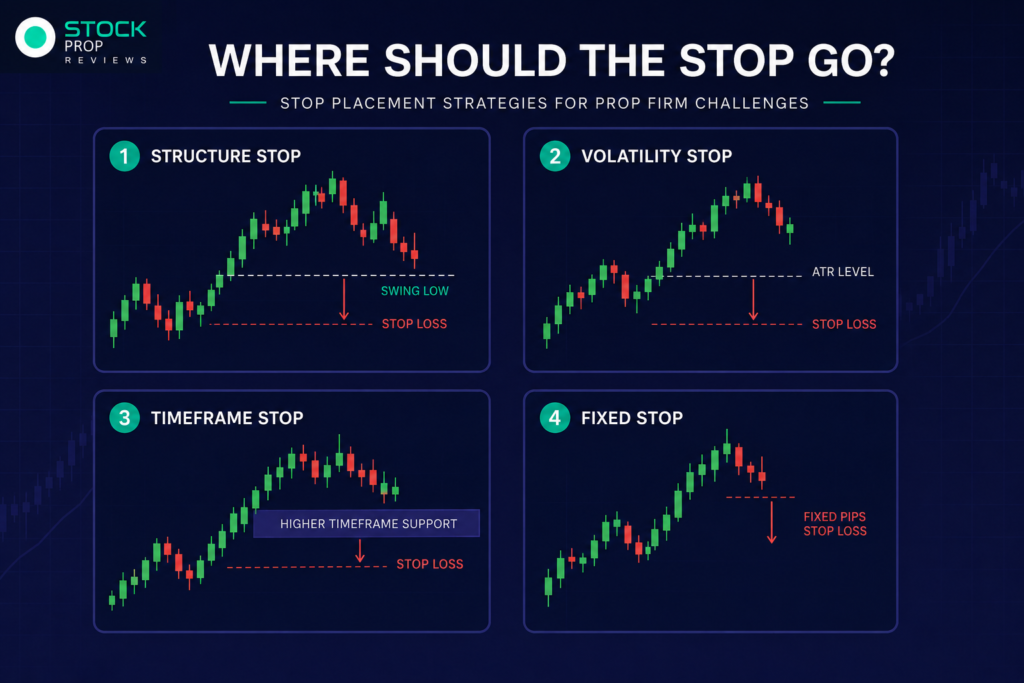
1. Structure-based stop
A structure-based stop sits beyond the price level that invalidates the setup.
For a long trade, that might be below a swing low, support zone or breakout structure.
For a short trade, it could sit above a swing high or resistance area.
This is generally more logical than selecting an arbitrary percentage or fixed number of points.
The downside is that structure-based stops can sometimes become relatively wide. Position size must then be reduced.
2. Volatility-based stop
A volatility-based stop uses a measure such as ATR to account for changing market conditions.
A market moving 2 points per candle should not necessarily receive the same stop distance as one moving 8 points per candle.
The advantage is adaptability.
The limitation is that volatility does not tell you where your trade thesis becomes invalid. A stop can be statistically appropriate for volatility but technically misplaced.
3. Timeframe-based stop
The trader can define the invalidation level using the timeframe responsible for the setup.
For example, a 15-minute breakout may use the 15-minute candle structure rather than a small five-minute fluctuation.
This can help to reduce the temptation to put on a very tight stop based on lower timeframe noise.
4. Fixed-distance stop
A fixed stop might use the same number of points or pips on every trade.
This is easy to execute and backtest, but it has an obvious weakness: markets do not maintain identical volatility throughout the day.
A fixed stop can be too wide during quiet conditions and too tight during volatile sessions.
What competitors often miss about stop losses
The common advice is “place your stop beyond support or resistance.”
That is not wrong, but it is incomplete for challenge traders.
The missing piece is drawdown survival.
Suppose your evaluation has a $5,000 maximum loss. A trader risking $1,000 per trade technically has five full losses before reaching that number.
In reality, that is not a sensible five-loss buffer. Commissions, slippage, floating losses, daily limits and correlated positions can reduce the practical room available.
A more conservative approach is to treat the firm’s maximum drawdown as a hard boundary rather than a normal operating risk budget.
That distinction matters psychologically too. Once a trader thinks, “I can afford to lose another $4,000,” the official limit can become an excuse to increase risk.
The objective should be to give your strategy enough attempts to demonstrate its edge without approaching the firm’s failure threshold.
A real challenge scenario
Consider a trader with a $50,000 evaluation.
The trader normally risks $250 per trade, or 0.5%.
Their setup produces a losing streak of four trades.
The account is down approximately $1,000 before costs.
Nothing unusual has happened. Losing streaks are part of trading.
Now imagine the same trader becomes frustrated after the first two losses and widens the stop while keeping the same position size.
Risk increases to $500 per trade.
Two additional losses now produce another $1,000 drawdown.
The strategy did not suddenly become twice as bad.
The risk management changed.
This is how traders actually fail challenges. They often do not lose because every entry was wrong. They lose because their response to losing trades changes the size of subsequent losses.
Research and education on challenge risk management consistently points to the importance of sizing against drawdown rather than the nominal account balance as the amount available to risk.
The three most common stop-loss mistakes
Putting the stop where it feels comfortable
A trader enters long and places the stop close enough that the potential loss feels small.
That is backwards.
The market should determine where the setup becomes invalid. Position size should then be adjusted to make the resulting loss acceptable.
Moving the stop farther away
This is one of the most damaging habits during a challenge.
The trader originally decides:
“Below this low, the setup is invalid.”
Price approaches the stop.
Instead of accepting the loss, the trader moves the stop lower.
The original risk calculation is now meaningless.
A losing trade becomes an open-ended decision.
Making the stop extremely tight
The opposite problem is just as common.
A trader wants an excellent reward-to-risk ratio, so they place the stop just a few ticks beyond entry.
The trade can have a theoretically attractive 1:4 risk-to-reward ratio but still perform poorly if normal price fluctuations repeatedly hit the stop before the intended move occurs.
A good reward-to-risk ratio does not make a bad stop good.
Stop loss versus challenge drawdown
Your stop should be thought of on two levels.
Trade level: Where does the set up go invalid?
Account level: What percentage of the available drawdown is that loss?
For example, if your personal risk is 0.5% per trade and the challenge maximum drawdown is 10%, it would take a theoretical sequence of twenty full losses to reach that boundary before considering other rules and costs.
That doesn’t mean you should plan on twenty losses.
That means the risk unit is small enough for the strategy to have normal variance.
The calculation is more relevant when the firm’s daily loss limit is a lot smaller than its overall drawdown. Total drawdown , however , is not as important as a daily breach . You can have several losing trades in one session .
A practical stop-loss framework
Before entering a challenge trade, work through five questions:
- So what is wrong with this setup?
- How far is that level from the entrance?
- How much do I want to lose if the stop is hit?
- What size position gives you that max loss?
- Does the trade still make sense relative to the stop distance?
If the stop becomes so wide that the required position size is too small to make the strategy viable, do not automatically tighten the stop.
Sometimes the correct conclusion is simply that the trade is not attractive.
That is an important distinction between risk management and trade forcing.
Stop-loss placement and passing rate
There is no reliable universal percentage showing that one particular stop method increases challenge passing rates by a specific amount.
Any article making such a claim without controlled data should be treated cautiously.
What can be established is the mathematical relationship.
Smaller risk per trade generally allows more losing trades before a drawdown boundary is reached. But smaller risk also means more winning trades may be required to reach a fixed profit target.
That creates a trade-off.
A trader risking 0.25% may have excellent survival characteristics but need substantially more net gains to reach a 6%, 8% or 10% target.
A trader risking 2% may reach the target faster if the strategy performs well, but a short losing streak can seriously damage the account.
The best risk level is therefore not simply the smallest possible number. It must fit the strategy’s historical win rate, average reward-to-risk, losing streak and the firm’s exact rules.
Trade The Pool and stop-loss planning
For stock traders, TradeThe Pool is worth considering because its program is specifically built around stock trading rather than futures-only evaluation models. Its current program materials show different objectives and drawdown parameters depending on the account type, so traders should check the exact account rules before entering.
One correction is important here: TradeThe Pool should not be described as a regulated stock prop firm. Its own disclosures state that the proprietary trading industry is not yet regulated and that the company is not a financial institution or other regulated financial entity outside the applicable regulatory framework.
What it does offer is relatively clear published information around its program rules and risk parameters. That transparency is more useful to a challenge trader than a vague claim about regulation.
Readers can get up to 10% discount when purchasing through our TradeThePool link.
If you are comparing providers, also look at our TradeThe Pool review, stock prop firm comparison, and prop firm rules reality check before choosing an evaluation. The key is to compare the actual drawdown structure with the way you trade, not simply the advertised account size.
Who should avoid tight stop losses?
Tight stops are particularly unsuitable for traders whose setups naturally require room to develop.
That includes many swing traders, breakout traders entering volatile instruments, and traders whose strategy depends on higher-timeframe support or resistance.
A tight stop may also be problematic for traders who have not tested their strategy sufficiently to know its normal adverse excursion.
If you do not know how far winning trades typically move against you before becoming profitable, you are guessing about stop placement.
Who should avoid wide stop losses?
Wide stops are a problem when they are used to avoid admitting that the trade thesis is wrong.
They are also unsuitable when the resulting position size becomes so large relative to the account that normal losses threaten the daily drawdown.
A wide stop can be completely reasonable on a higher-timeframe setup.
A wide stop with oversized exposure is not.
A better way to test your stop
Do not optimize your stop solely by looking for the highest backtested win rate.
Track at least:
| Metric | Why it matters |
| Average stop distance | Shows typical trade risk |
| Maximum adverse excursion | Shows how far trades move against you |
| Win rate | Helps evaluate whether the stop is compatible with the setup |
| Average R multiple | Shows the quality of winners relative to risk |
| Longest losing streak | Helps estimate challenge survival |
| Daily loss concentration | Shows whether losses cluster in particular sessions |
| Slippage | Shows whether actual losses exceed planned losses |
The most useful test is often not “Which stop makes the most money?”
It is:
Which stop allows the strategy to survive its normal losing streak while keeping the reward-to-risk profile viable?
That is much closer to the problem a prop trader actually needs to solve.
Best stop-loss approach by trader type
| Trader type | Usually more suitable | Main danger |
| Scalper | Structure plus short-term volatility | Stops too tight |
| Breakout trader | Beyond breakout structure | Entering before confirmation |
| Intraday trend trader | Swing/structure stop | Oversizing a wide stop |
| Swing trader | Higher-timeframe invalidation | Excessive account exposure |
| Beginner | Simple structure-based rules | Moving stops emotionally |
These are starting frameworks, not universal prescriptions. The correct stop should come from tested strategy behavior.
Final verdict
Stop loss placement can be a real determining factor in whether you’re able to pass a prop firm challenge because it’s a factor in the distance between entry and invalidation and it’s a factor in position size when monetary risk is fixed.
The biggest mistake is to treat stop distance and risk as the same thing.
No, they aren’t.
It’s a 50 point stop but that can be safer than a 10 point stop if the position size is correct and the 50 point level is truly the invalidation of the trade. In contrast, a 10-point stop can be dangerous if placed in normal market noise, or combined with over-leverage.
The practical sequence for challenge traders is simple:
First, find the technical invalidation level. Second risk. Calculate. Third, find your position size.
Don’t reverse that process to make the potential loss look smaller.
You don’t win a challenge by avoiding all losing trades. You do that by letting a tested strategy take normal losses without letting those losses eat up the account before the strategy has a chance to work.
FAQs
Should I use a fixed stop loss in a prop firm challenge?
Not so sure. A fixed stop is easy to control and test, but the volatility in the market changes. If they are part of a tested strategy, structure based or volatility adjusted stops can be more appropriate.
How much should I risk per trade during a challenge?
There is no universal number. Many conservative challenge plans use roughly 0.25% to 1% per trade, but the appropriate level depends on the firm’s drawdown rules, your strategy and its historical losing streak.
Is a wider stop loss more dangerous?
Not automatically. A wider stop becomes more dangerous when position size is not reduced accordingly. Risk is determined by both stop distance and position size.
Should I move my stop to breakeven?
Only if your strategy has evidence supporting the adjustment. Moving to breakeven too early can turn otherwise valid trades into premature exits and alter the strategy’s expected performance.
Can good stop placement guarantee that I pass a prop firm challenge?
No. Stop placement can control risk, but it cannot create a trading edge. Strategy quality, execution, drawdown rules, position sizing and psychological discipline all affect challenge outcomes.